How to Set Up a Hardware Wallet with MetaMask (Step-by-Step Guide)
In today’s fast-evolving crypto landscape, security is non-negotiable. With increasing incidents of wallet hacks and phishing attacks, protecting your crypto assets is more important than ever. One of the best ways to secure your holdings is by combining the convenience of MetaMask with the robust protection of a hardware wallet like Ledger or Trezor.
In this article, you’ll learn how to set up a hardware wallet with MetaMask step-by-step, the benefits of doing so, and why this setup is essential for serious crypto investors. Plus, we’ll share how you can also benefit from a $30,050 Bybit signup bonus to get started on your crypto journey.
👉 Claim your Bybit bonus now
What Is a Hardware Wallet?
A hardware wallet is a physical device designed to store your private keys offline. Unlike software wallets, which are connected to the internet, hardware wallets are cold storage solutions—making them almost immune to online hacks.
Popular hardware wallets include:
- Ledger Nano S / X
- Trezor Model One / Trezor Model T
- SafePal S1
These devices keep your seed phrases and private keys out of reach from phishing, malware, and browser-based threats.
Why Connect a Hardware Wallet with MetaMask?
MetaMask is a widely-used browser and mobile wallet that allows seamless access to Web3, DeFi, NFTs, and more. While it’s powerful, MetaMask alone is a hot wallet—meaning it’s always online and vulnerable to attacks.
Combining MetaMask with a hardware wallet gives you the best of both worlds:
- Security: Your private keys remain offline.
- Convenience: You can still use MetaMask for DeFi, staking, and NFTs.
- Control: Only physical confirmation on your hardware wallet can authorize transactions.
Step-by-Step Guide: Connect Hardware Wallet with MetaMask
Step 1: Set Up Your Hardware Wallet
Before connecting it to MetaMask, you need to set up your hardware wallet:
For Ledger:
- Visit ledger.com and download Ledger Live.
- Initialize your Ledger device and write down your 24-word recovery phrase.
- Set a PIN code.
- Install the Ethereum app via Ledger Live.
For Trezor:
- Go to trezor.io/start.
- Initialize the device and secure your recovery seed.
- Install Trezor Bridge or use Trezor Suite.
- Ensure the Ethereum app is ready.
Important: Always buy hardware wallets from the official website or trusted retailers. Never use a pre-owned device.
Step 2: Install MetaMask
If you haven’t already, install the MetaMask wallet:
- For Desktop: Add the MetaMask extension to Chrome, Brave, or Firefox.
- For Mobile: Download the MetaMask app from the App Store or Google Play.
Create a new wallet or import your existing one. Never share your recovery phrase with anyone!
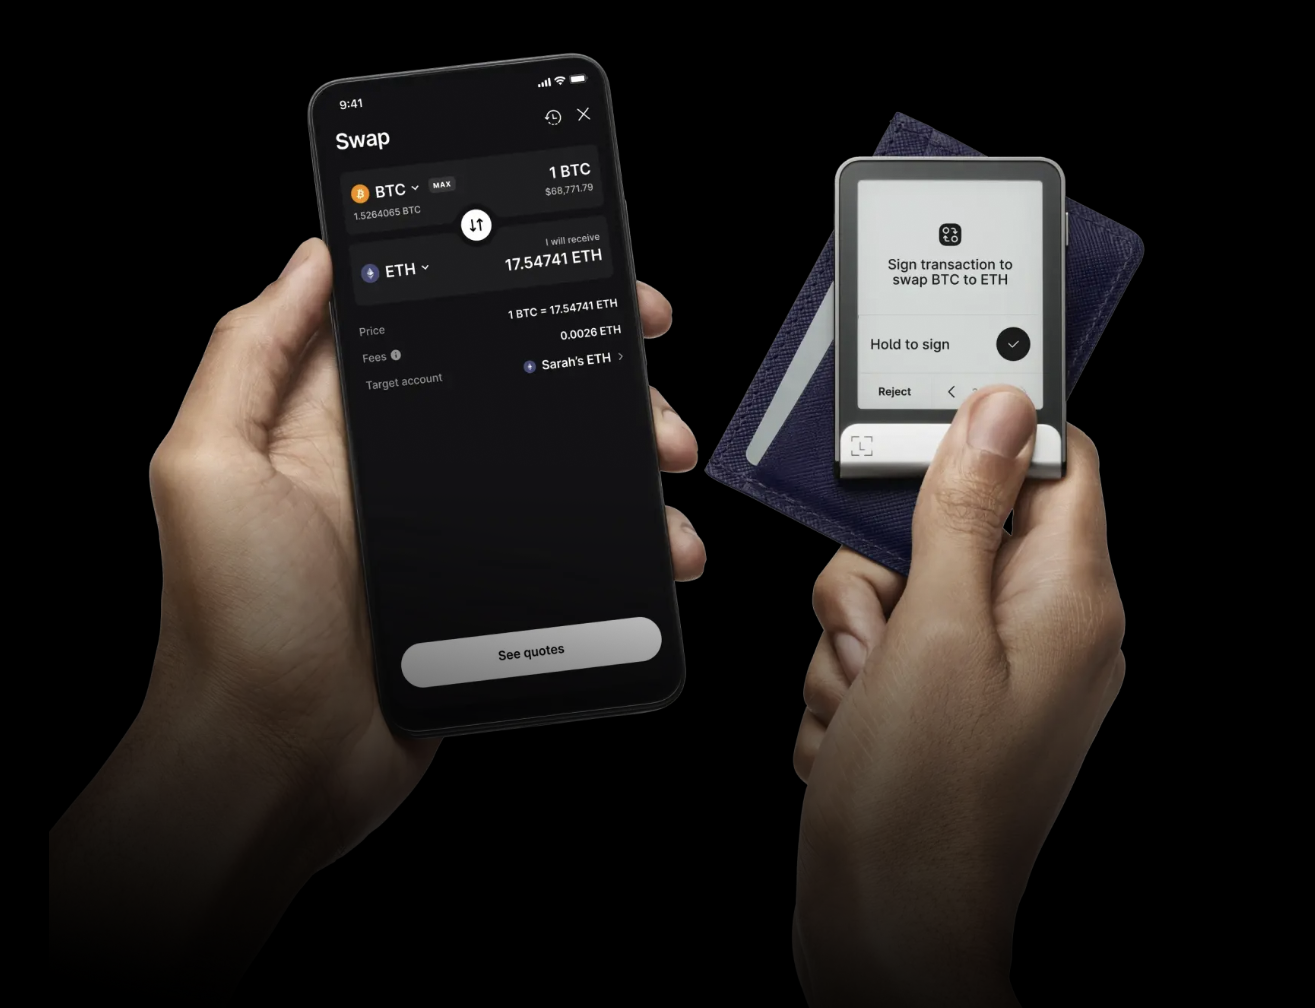
Step 3: Connect Hardware Wallet to MetaMask
- Open MetaMask and click on your profile icon.
- Select “Connect Hardware Wallet.”
- Choose Ledger or Trezor, depending on your device.
- Connect your device via USB or Bluetooth.
- Allow MetaMask to detect your wallet’s public keys.
- Choose the address you want to use and click “Unlock.”
You’re now connected! Your MetaMask interface will look the same, but all signing will require physical confirmation on your hardware wallet.
Step 4: Using MetaMask + Hardware Wallet
Once your hardware wallet is connected:
- You can send/receive crypto, interact with dApps, stake tokens, or swap assets.
- MetaMask acts as the interface, while your hardware wallet signs the transaction.
- You’ll be prompted to approve or reject any transaction on the device.
Pro Tip: You can connect your wallet to decentralized platforms like Uniswap, Aave, Curve, or OpenSea, and safely interact with DeFi protocols without exposing private keys.
Tips for Secure Usage
To maximize your wallet security:
- Never expose your seed phrase: Write it down on paper and store it offline in a fireproof safe.
- Keep firmware updated: Regular updates fix security vulnerabilities.
- Double-check URLs: Only use official sites to avoid phishing.
- Enable MetaMask permissions carefully: Never grant full approvals to suspicious sites.
For even stronger protection, consider using a fresh MetaMask account solely for hardware wallet access, separate from any hot wallet accounts.
Bonus: Start Trading with $30,050 on Bybit
Once your MetaMask and hardware wallet are secured, you’re ready to explore the broader crypto world. If you’re looking for a secure and advanced platform to trade crypto, futures, or participate in airdrops, Bybit is a top choice.
Bybit offers:
- Powerful charting tools
- Copy trading and launchpad access
- Robust DeFi integrations
- Zero-downtime infrastructure
💰 Get up to $30,050 bonus now:
👉 Sign up on Bybit with this link
This exclusive bonus gives you trading credits, fee rebates, and deposit rewards.
Frequently Asked Questions (FAQs)
✅ Is it safe to connect my hardware wallet to MetaMask?
Yes. Your private keys never leave the device. MetaMask simply acts as a visual interface. Signing still requires physical confirmation on your hardware wallet.
🔁 Can I swap tokens with MetaMask + hardware wallet?
Yes, but keep in mind that swaps might require gas fees and approval transactions—each of which needs to be signed via your hardware wallet.
🔐 What happens if I lose my hardware wallet?
If you’ve saved your recovery phrase, you can restore your wallet on a new device. If not, you will lose access to your funds permanently.
🪙 Can I store NFTs with this setup?
Absolutely. You can safely store, buy, or sell NFTs while keeping them secured with your hardware wallet through MetaMask.
Final Thoughts
Setting up a hardware wallet with MetaMask is one of the smartest steps you can take to secure your crypto assets. Whether you’re into DeFi, NFTs, or long-term holding, this combination offers maximum protection with seamless user experience.
By connecting your cold wallet to MetaMask, you gain full control of your digital assets while protecting them from online threats.
Ready to take your crypto security and trading to the next level?
Secure your crypto with a hardware wallet + MetaMask, and claim your exclusive Bybit bonus below: