How to Use MetaMask on Desktop and Mobile (Beginner’s Guide 2025)
If you’re stepping into the world of Web3, DeFi, NFTs, or crypto gaming, the very first tool you need is a crypto wallet— and there’s no wallet more popular and beginner-friendly than MetaMask.
MetaMask lets you interact with decentralized applications (dApps) across multiple blockchains like Ethereum, BNB Chain, Polygon, and more. Whether you’re using a desktop browser or mobile phone, this guide will show you how to use MetaMask safely, effectively, and efficiently.
👉 Bonus Tip: Once you’re familiar with MetaMask, you can also explore trading opportunities with advanced platforms like Bybit.
Sign up on Bybit now and get up to $30,000 in bonuses using this link:
https://partner.bybit.com/b/bitfarmfi
Disclaimer: This article is for educational purposes only and does not constitute financial advice.
🔐 What is MetaMask?
MetaMask is a non-custodial cryptocurrency wallet that allows users to store, send, and receive crypto assets. It also serves as a bridge to Web3, enabling users to:
- Connect to dApps
- Interact with smart contracts
- Swap tokens directly from the wallet
- Collect and store NFTs
MetaMask is available as:
- A browser extension for Chrome, Firefox, Brave, and Edge
- A mobile app for Android and iOS
Let’s dive into setting it up and using it like a pro.
💻 How to Use MetaMask on Desktop
Step 1: Install the Browser Extension
- Go to the official MetaMask website: https://metamask.io
- Click “Download” and select your browser (Chrome, Firefox, Brave, etc.)
- Install the extension and pin it to your browser toolbar for easy access.
📌 Warning: Always double-check the URL to avoid phishing scams.
Step 2: Create a New Wallet
- Click on the MetaMask icon in your browser toolbar.
- Click “Get Started” → “Create a Wallet”
- Set a strong password
- Back up your 12-word Secret Recovery Phrase and store it securely offline.
🚫 Never share your seed phrase with anyone — it’s the master key to your wallet.
Step 3: Add Networks (Ethereum, BNB Chain, etc.)
By default, MetaMask only supports Ethereum. To use other chains:
- Click your profile icon → “Settings” → “Networks”
- Add chains like BNB Chain, Polygon, Arbitrum, etc.
- Use a trusted source like Chainlist.org for accurate RPC data.
Step 4: Fund Your Wallet
To start using MetaMask, you’ll need some crypto:
- Buy ETH or BNB from an exchange like Bybit
👉 Claim up to $30,000 bonus on Bybit - Withdraw funds to your MetaMask wallet address
📌 Tip: Copy your wallet address from MetaMask and paste it into the withdrawal section of the exchange.
Step 5: Interact with dApps
Now you can use MetaMask to:
- Trade on Uniswap or PancakeSwap
- Mint or buy NFTs on OpenSea
- Stake tokens in DeFi protocols
- Play Web3 games
When connecting to any dApp:
- Click “Connect Wallet”
- Approve the connection on your MetaMask popup
Done! You’re now part of the decentralized internet.
📱 How to Use MetaMask on Mobile
MetaMask is also available as a fully functional mobile app. Here’s how to use it:
Step 1: Download MetaMask Mobile
- Available on the App Store (iOS) and Google Play Store (Android)
- Only download the official app from MetaMask by ConsenSys
Step 2: Create or Import a Wallet
- Open the app and choose “Create a New Wallet” or “Import Using Secret Phrase”
- Set up your password or biometric login for convenience
- Back up your seed phrase securely
📌 Mobile MetaMask is self-custodial — you control your keys.
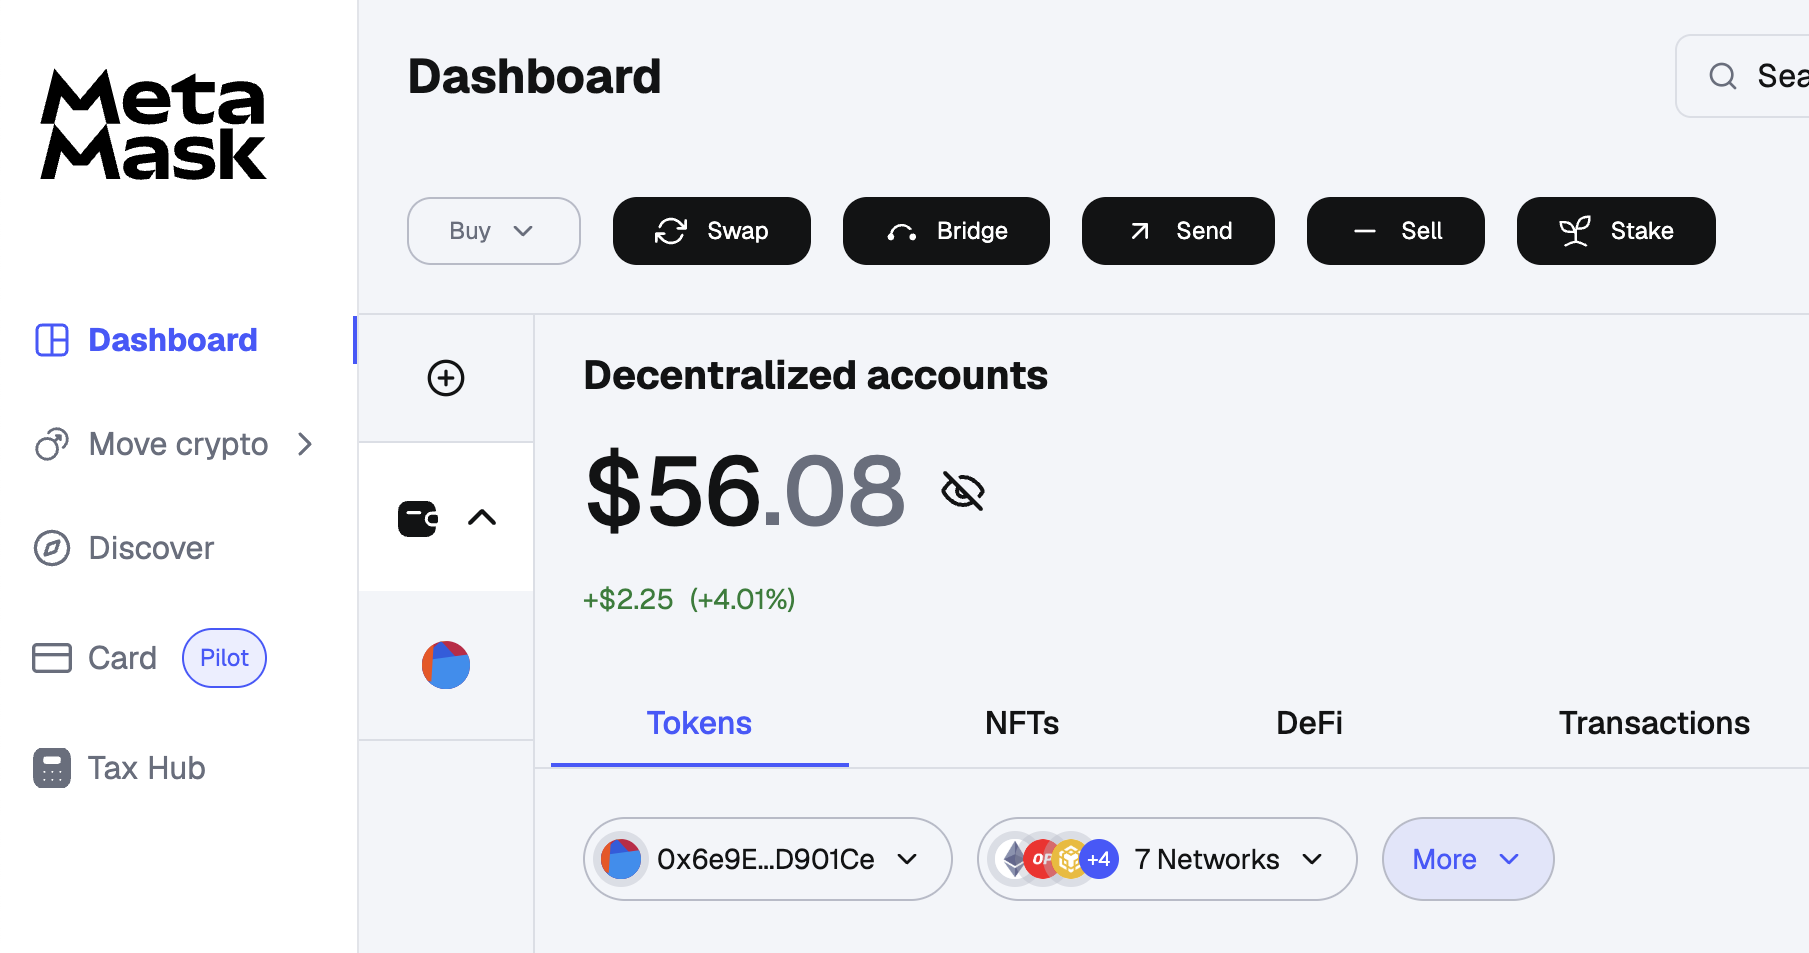
Step 3: Navigate the App
The mobile app has a clean interface with:
- Browser: A built-in dApp browser to use DeFi and NFT platforms
- Wallet: View balances, transaction history, and NFTs
- Swap: Directly swap tokens without leaving the app
- Settings: Add networks, change themes, and manage accounts
Step 4: Add Custom Tokens
Sometimes, your tokens won’t show up automatically. To add them:
- Tap “Import Tokens”
- Paste the token’s contract address (from CoinGecko or the project’s site)
- Confirm — now your tokens are visible!
Step 5: Connect to Mobile dApps
Using the dApp browser in MetaMask:
- Navigate to platforms like Uniswap, Opensea, or Layer3
- Interact just like on desktop
- You’ll receive in-app approval requests for every transaction
🔐 MetaMask Safety Tips
MetaMask is powerful, but it’s also a target for scams. Follow these rules:
✅ DO:
- Back up your seed phrase offline (not on your phone or PC)
- Use a hardware wallet for high-value funds
- Double-check URLs before connecting your wallet
- Revoke approvals regularly on revoke.cash
❌ DON’T:
- Click links from unknown sources or DMs
- Share your seed phrase or private key
- Approve suspicious smart contracts
- Store sensitive info in your browser
🪙 Pro Tip: Use MetaMask + Bybit Combo
Once you’re comfortable with MetaMask, you’ll want to explore trading and airdrop farming more aggressively. That’s where Bybit comes in.
- Trade futures, spot, or stake tokens easily
- Withdraw to your MetaMask wallet for DeFi or NFT use
- Participate in launchpads, airdrops, and staking
👉 Sign up here and get up to $30,000 in bonuses:
https://partner.bybit.com/b/bitfarmfi
Bybit + MetaMask is a powerful combo for any serious crypto user.
🧠 Final Thoughts: Master Your Web3 Journey
MetaMask is more than just a wallet — it’s your gateway to Web3, and using it on both desktop and mobile gives you full flexibility across DeFi, NFTs, gaming, and more.
With this step-by-step guide, you’re now ready to:
- Set up and secure MetaMask
- Add networks and tokens
- Interact with dApps
- Swap, send, and receive crypto on the go
And don’t forget to level up your crypto game by signing up for Bybit to earn rewards, bonuses, and trade like a pro.
👉 Claim your Bybit bonus now:
https://partner.bybit.com/b/bitfarmfi
Welcome to the decentralized future. You’re in control now.
Disclaimer: Crypto involves risk. This post is not financial advice. Always do your own research before using wallets or investing in cryptocurrencies.